Access git remote with SSH
| gitWhen I started working I found it challenging to work on my personal projects and
the work projects on the same machine. At that time I saved my authentication
data in the .git-cretendials file, and I didn’t know how to handle
different credentials for different projects.
After some researches I found out that you can access your projects with a SSH key!
But, what does that mean?
At the beginning of my love-story with git, I learned that to work with a remote
server I had to use a private password or key. For each push or pull, or more
in general, for each command that had to interact with remote, I had to write
the passowrd. Or better, I could save it somewere, ready to be used by git.
With the SSH approach, you will not use a password, or at least, you will not use
a password like you are used to.
You will use a pair of SSH keys, one public and one private, to authenticate with the remote
server, like GitHub or GitLab. Keeping the private half on your machine and
installing the public half on the remote server.
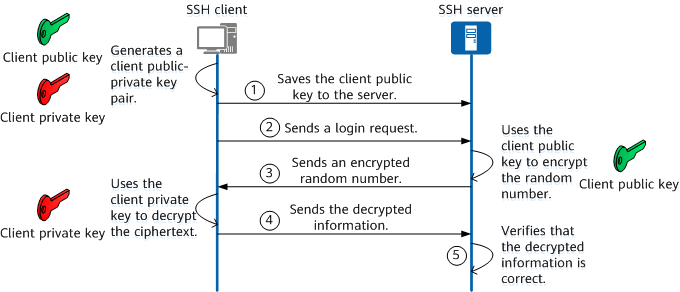
This is how the authentication works:
-
Before setting up an SSH connection, the SSH client needs to generate its own public-private key pair and store its public key on the remote server.
-
The SSH client sends a login request to the remote server.
-
The remote server searches for the client public key based on information such as the username in the request, encrypts a random number using the public key, and sends the encrypted random number to the client.
-
Upon receipt, the SSH client uses its own private key to decrypt the returned information before sending the decrypted information to the remote server.
-
The remote server checks whether the decrypted information sent by the SSH client is correct; if the information is correct, authentication is successful.

There was another change that I had to make, given that I don’t use the same name and
email for all my projects I removed them from the global git configuration
(~/.gitconfig). Instead of setting this data
globally, as git suggests, I set them locally for each project: git config user.name "<Name>".
For my private project I use my email, and for work-related projects I use the
work email.
How to create a ssh key
To create the SSH keys, you can run the following command
$ ssh-keygen -t ed25519 -C "<email>"
The command will ask if you want to set a password for the key, omitting it will allow you to use the key without entering the password each time you use it.
The command will generate the keys in the current directory, so, I suggest
executing it in the ~/.ssh/ directory. This directory is used to configure all
the SSH-related stuff.
The command will generate two keys, one private and one public (.pub).
The private key must remain private and must not be shared or used with
more than one device, for security reasons. The public key must be shared with
all the services that you want to interact with, in this case GitHub or
GitLab.
To make use of these keys easier, we can write a configuration file, named
config, in the ~/.ssh/ directory.
This is an example of my configuration file
Host git-personal # name chosen by me
    Hostname github.com
    User git
    IdentityFile ~/.ssh/git_personal # private ssh-key

Host git-work # name chosen by me
    Hostname github.com
    User git
    IdentityFile ~/.ssh/git_work # private ssh-key
To use one key, you can digit the name you choose as Host.
For example, to clone my own dotfiles I would write
$ git clone git-personal:Klodii/dotfiles.git
Of course, I already associated my public key with my GitHub account; otherwise, I would have gotten an error.